Install GlassFish 3.1 on CentOS or RHEL
Published (Last updated 11/01/2013 05:28 AM)
Permalink https://davidghedini.com/pg/entry/install_glassfish_3_1_on
This post will cover installing GlassFish 3.1 on CentOS or RHEL.
We’ll also see how to run GlassFish as a service, how to access the Admin Console, and how to run GlassFish under a minimally privileged user.
GlassFish 3.1 is the latest release and is available as GlassFish Server Open Source Edition 3.1 (free) and Oracle GlassFish Server 3.1 (supported and requires paid subscription).
I installed both using the same process below.
The procedure is the same as with 3.0.1 with some minor changes.
If you do not already have the Java Development Kit (JDK) installed on your machine, you will need to download and install the required JDK for your platform.
If you do have the JDK installed, you can skip to: Step 2: Download and Install the GlassFish 3.1 Server:
You can download the JDK here: http://www.oracle.com/technetwork/java/javase/downloads/index.html
I’m using the latest, which is JDK 6, update 24. The JDK is specific to 32 and 64 bit versions.
My CentOS box is 64 bit, so I’ll need: jdk-6u24-linux-x64.bin.
If you are on 32 bit, you’ll need: jdk-6u24-linux-i586.bin
Download the appropriate JDK and save it to a directory. I’m saving it to /root.
Move (mv) or copy (cp) the file to the /opt directory:
|
1 |
[root@sv2 ~]# mv jdk-6u24-linux-x64.bin /opt/jdk-6u24-linux-x64.bin |
Create the directory /usr/java.
|
1 |
[root@sv2 ~]# mkdir /usr/java |
Change to the /usr/java directory we created and install the JDK using ‘sh /opt/jdk-6u24-linux-x64.bin’
|
1 2 |
[root@sv2 ~]# cd /usr/java [root@sv2 java]# sh /opt/jdk-6u24-linux-x64.bin |
Set the JAVA_HOME path. This is where we installed the JDK above.
To do this for your current session, you can issue the following:
|
1 2 3 4 |
[root@sv2 java]# JAVA_HOME=/usr/java/jdk1.6.0_24 [root@sv2 java]# export JAVA_HOME [root@sv2 java]# PATH=$JAVA_HOME/bin:$PATH [root@sv2 java]# export PATH |
To set the JAVA_HOME for users, we add this to the user ~/.bashrc or ~/.bash_profile of the user. We can also add it /etc/profile and then source it to give to all users.
|
1 2 3 4 |
JAVA_HOME=/usr/java/jdk1.6.0_24 export JAVA_HOME PATH=$JAVA_HOME/bin:$PATH export PATH |
Once you have added the above to ~/.bash_profile or ~/.bashrc, you should log out, then log back in and check that the JAVA_HOME is set correctly.
|
1 2 |
[root@sv2 ~]# echo $JAVA_HOME /usr/java/jdk1.6.0_24 |
You can download both the GlassFish Server Open Source Edition 3.1 and Oracle GlassFish Server 3.1 at http://glassfish.java.net/
Once you have downloaded the desired file, move (mv) or copy (cp) the file to /usr/share/glassfish-3.1.zip (or /usr/share/ogs-3.1.zip for Oracle GlassFish).
|
1 |
[root@sv2 ~]# mv glassfish-3.1.zip /usr/share/glassfish-3.1.zip |
Change to the /usr/share directory and unzip the file:
|
1 2 |
[root@sv2 ~]# cd /usr/share [root@sv2 share]# unzip -q glassfish-3.1.zip |
The unzip will create the following directory: /usr/share/glassfish3
Note: Both GlassFish editions will create the same directory when unzipped: glassfish3
To run GlassFish as a service and enable start up at boot, we’ll now create a Start/Stop/Restart script.
We’ll create the script as /etc/init.d/glassfish, make the script executable, and then add our new glassfish service to chkconfig.
Create our glassfish script:
|
1 2 |
[root@sv2 ~]# cd /etc/init.d [root@sv2 init.d]# vi glassfish |
|
1 2 3 4 5 6 7 8 9 10 11 12 13 14 15 16 17 18 19 20 21 22 23 |
#!/bin/bash # description: Glassfish Start Stop Restart # processname: glassfish # chkconfig: 234 20 80 JAVA_HOME=/usr/java/jdk1.6.0_24 export JAVA_HOME PATH=$JAVA_HOME/bin:$PATH export PATH GLASSFISH_HOME=/usr/share/glassfish3/glassfish case $1 in start) sh $GLASSFISH_HOME/bin/asadmin start-domain domain1 ;; stop) sh $GLASSFISH_HOME/bin/asadmin stop-domain domain1 ;; restart) sh $GLASSFISH_HOME/bin/asadmin stop-domain domain1 sh $GLASSFISH_HOME/bin/asadmin start-domain domain1 ;; esac exit 0 |
If you do not set the JAVA_HOME and PATH in the GlassFish script, when you attempt to start the GlassFish server it will complain it cannot find Java with the following:
error: /usr/share/glassfish3/glassfish/bin/asadmin: line 19: exec: java: not found
Now, make the script executable and add it to our chkconfig so it starts at boot.
|
1 2 3 |
[root@sv2 init.d]# chmod 755 glassfish [root@sv2 init.d]# chkconfig --add glassfish [root@sv2 init.d]# chkconfig --level 234 glassfish on |
We should now be able to Start, Stop, and Restart GlassFish as a service.
Start GlassFish:
|
1 2 3 4 5 6 7 |
[root@sv2 init.d]# service glassfish start Waiting for domain1 to start ......... Successfully started the domain : domain1 domain Location: /usr/share/glassfish3/glassfish/domains/domain1 Log File: /usr/share/glassfish3/glassfish/domains/domain1/logs/server.log Admin Port: 4848 Command start-domain executed successfully. |
Stop GlassFish:
|
1 2 3 |
[root@sv2 init.d]# service glassfish stop Waiting for the domain to stop .... Command stop-domain executed successfully. |
You should now see the GlassFish default home page at http://youdomain.com:8080 or http://YourIP:8080

If you do not see the home page, check the logs and insure that port 8080 is open and available.
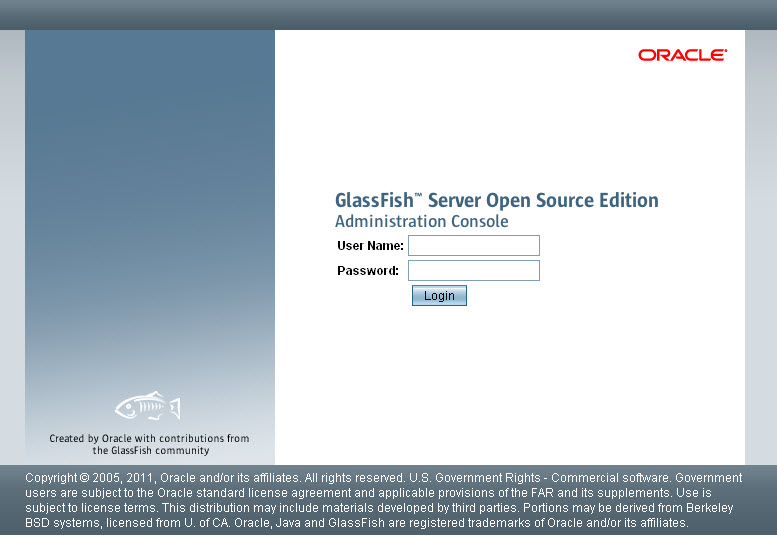
You should now be able to access the GlassFish Admin Console at:
http://yourdomain.com:4848 or http://yourip:4848

On accessing the GlassFish Admin Console for the first time, you will find that no user name or password is required.
Previous to 3.1, a default password ‘adminadmin’ was used.
You can set (or change) the admin password within the GlassFish Admin console.
1. Click “Domain” on the tree.
2. Click the Administrator Password tab.
3. Enter and confirm your password and click Save.
4. Note that the “Logout” button now appears at top right.
The first password save will create a file,.asadminpass, in the home directory of the user you are running the service under.
Alternatively, you can set the admin password via the CLI using.
|
1 2 3 4 5 6 7 8 |
[root@sv2 bin]# $GLASSFISH_HOME/bin/asadmin change-admin-password Enter admin user name [default: admin]> Enter admin password> Enter new admin password> Enter new admin password again> Command change-admin-password executed successfully. [root@sv2 bin]# |
Since I am installing this on my development machine, I am running GlassFish as root above.
In production, you will want to run GlassFish as a non-root user with minimal privileges.
To do this, we can need to the following.
1. Create the user, glassfish, who will own the files.
Create the new group, glassfish, and add the user glassfish to the group:
|
1 2 |
[root@sv2 ~]# groupadd glassfish [root@sv2 ~]# useradd -s /bin/bash -g glassfish glassfish |
2. Change ownership of the GlassFish files to the user glassfish we created.
We’ll change ownership of the files under /usr/share/glassfish3 from root to the user glassfish we created above:
|
1 |
[root@sv2 ~]# chown -Rf glassfish.glassfish /usr/share/glassfish3/ |
3. Update our glassfish script.
Finally, we update the glassfish start/stop/restart script we created above so we su to user glassfish:
|
1 2 3 4 5 6 7 8 9 10 11 12 13 14 15 16 17 18 19 20 21 22 23 24 |
#!/bin/bash # description: Glassfish Start Stop Restart # processname: glassfish # chkconfig: 234 20 80 JAVA_HOME=/usr/java/jdk1.6.0_24 export JAVA_HOME PATH=$JAVA_HOME/bin:$PATH export PATH GLASSFISH_HOME=/usr/share/glassfish3/glassfish GLASSFISH_USER=glassfish case $1 in start) su $GLASSFISH_USER -c "$GLASSFISH_HOME/bin/asadmin start-domain domain1" ;; stop) su $GLASSFISH_USER -c "$GLASSFISH_HOME/bin/asadmin stop-domain domain1" ;; restart) su $GLASSFISH_USER -c "$GLASSFISH_HOME/bin/asadmin stop-domain domain1" su $GLASSFISH_USER -c "$GLASSFISH_HOME/bin/asadmin start-domain domain1" ;; esac exit 0 |
To run services below port 1024 as user other than root, you will need to use port forwarding.
You can do this by adding the following to your IP tables:
|
1 2 |
[root@sv2 ~]# iptables -t nat -A PREROUTING -p tcp -m tcp --dport 80 -j REDIRECT --to-ports 8080 [root@sv2 ~]# iptables -t nat -A PREROUTING -p udp -m udp --dport 80 -j REDIRECT --to-ports 8080 |